OpenIDM is one of the markets most flexible platforms for identity management. Embedded as part of the product is a business process engine supporting the industry standard BPMNv2 for defining processes and workflow. Business logic in OpenIDM supports both Groovy and JavaScript which also applies to the business process engine.
In this little sample, i will demonstrate using one of the sample use-cases, how we can quickly and easily extend it, to include integration with a third party solution exposing RESTful APIs. For this i’ve chosen Twitter.
For this simple example to work, i’m starting off fresh with an instance of OpenDJ and OpenIDM 3.1. OpenDJ should be installed and pre-loaded according to the instructions found in $OPENIDM/samples/usecase/README (found once OpenIDM is unzipped).
Usecase1 - Initial reconciliation
In this step we import the users from OpenDJ to OpenIDM using reconciliation.
To prepare to run the sample, download OpenDJ directory server from
http://forgerock.org/opendj.html. Install OpenDJ using QuickSetup:
* Use "password" as the password for cn=Directory Manager.
* Import samples/usecase/data/hr_data.ldif during installation.
1. Start OpenIDM with the configuration for usecase1.
$ cd /path/to/openidm
$ ./startup.sh -p samples/usecase/usecase1
2. Run reconciliation.
$ curl -k -u openidm-admin:openidm-admin -H "Content-Type: application/json" -X POST "https://localhost:8443/openidm/recon?_action=recon&mapping=systemHRAccounts_managedUser"
3. Query the managed users created by reconciliation
$ curl -k -u openidm-admin:openidm-admin "https://localhost:8443/openidm/managed/user?_queryId=query-all-ids"
There should be 23 users created. The default password of the imported users is "Passw0rd"
Groovy support a capability to reference artifacts and resolve dependencies and make it available on the Classpath called Grab. Grab is called upon within your scripts with the @grab annotation. With this support and Groovy, there is no need to compile java code, deploy along with required dependencies and manipulate the classpath. For this capability we need to grab a copy of ivy, extract the ivy-2.4.0.jar and make it available to OpenIDM by copying the jar-file to $OPENIDM/bundle.
At this stage we have OpenDJ up and running and now its time to take a closer look at the createNewUser workflow part of usecase2. This is the workflow i want to extend with an activity to tweet whenever a new user is provisioned, welcoming her to the world.
The integration with Twitter are using OAUTH authentication, so we need create a twitter account for the purpose of this exercise and generate the OAUTH credentials and tokens.
- Consumer Key
- Consumer Secret
- Access Token
- Access Token Secret
To start with, as mentioned above you need a Twitter account unless you already have one. Once created, login to the Twitter Developer Site. Go to Manage my Apps and click “Create a new application”. Fill out the mandatory fields and submit. By completing this process you will be provided the above required information to continue building your scriptTask and utilize it in your workflow.
Now, lets make a copy of the usecase2 folder and perform our edits on the copy, thereby keeping the original for reference.
$ cp -r $OPENIDM/sample/usecase/usecase2 \ $OPENIDM/sample/usecase/usecase2twitter
make the copy your working directory and unzip the bar-file containing the workflow.
$ cd $OPENIDM/sample/usecase/usecase2twitter && unzip newUserCreate.bar
The bar file contains two forms and the actual workflow definition.
createNewUser.bpmn20.xml
nUCDecideApprovalForm.xhtml
nUCStartForm.xhtml
We are going to perform two steps with the createNewUser.bpmn20.xml workflow definition. First add a scriptTask and then wire the transitions to include the new scriptTask before the processes reached its end.
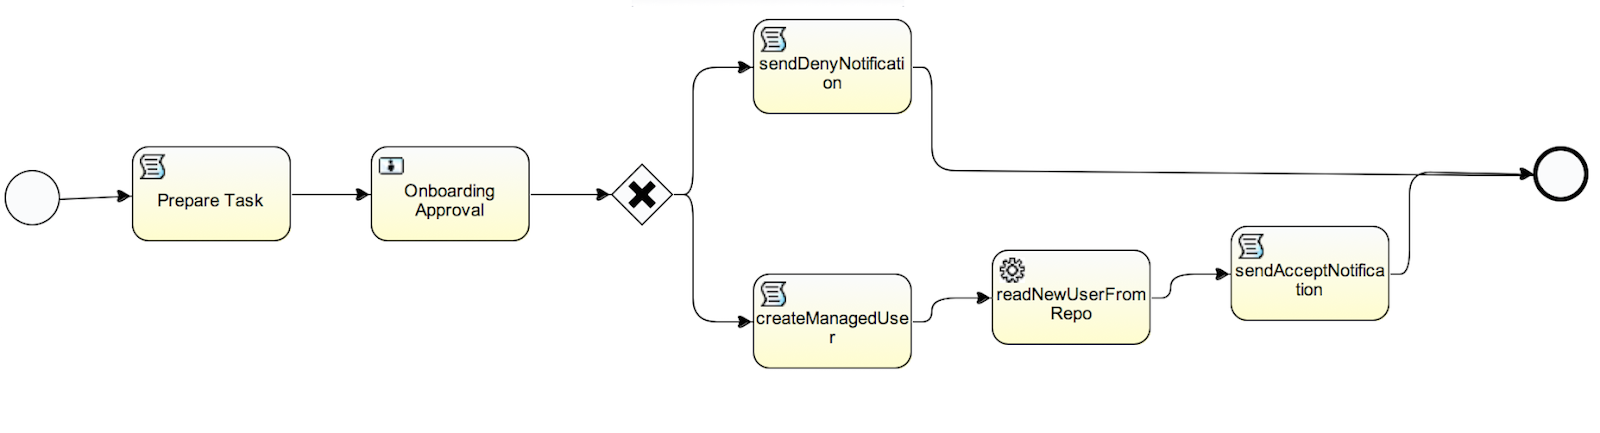 Diagram 1: The unaltered newUserCreate workflow
<scriptTask id="tweet" name="Tweet Welcome" scriptFormat="groovy" activiti:autoStoreVariables="false">
<script>
@Grab(group='org.codehaus.groovy.modules.http-builder', module='http-builder', version='0.5.1')
@Grab(group='oauth.signpost', module='signpost-commonshttp4', version='1.2.1.1')
import groovyx.net.http.RESTClient
import static groovyx.net.http.ContentType.*
twitter = new RESTClient( 'https://api.twitter.com/1.1/statuses/' )
try {
twitter.auth.oauth pom.properties.'twitter.oauth.consumerKey',
pom.properties.'twitter.oauth.consumerSecret',
pom.properties.'twitter.oauth.accessToken',
pom.properties.'twitter.oauth.secretToken'
println "Sending tweet..."
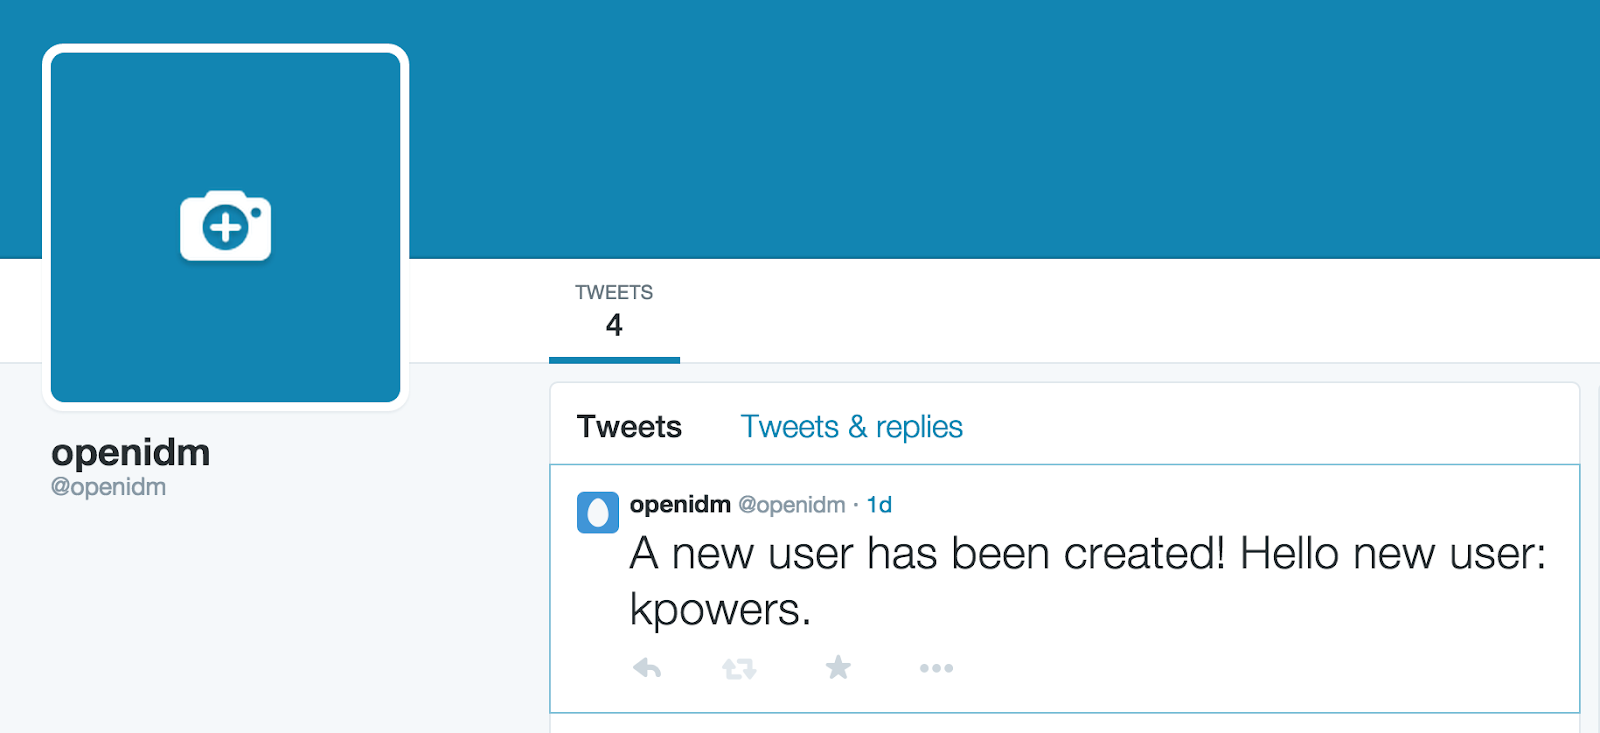
msg = "A new user has been created! Hello new user: ${userName}."
resp = twitter.post( path : 'update.json', body : [ status:msg, source:'httpbuilder' ], requestContentType : URLENC )
println "Tweet response status: ${resp.statusLine}"
assert resp.statusLine.statusCode == 200
} catch (all) {
out:println "Exception " + all.getMessage()
out:println "Exception " + all.getStackTrace()
}
</script>
</scriptTask>
The twitter.oauth.consumerKey, twitter.oauth.consumerSecret, twitter.oauth.accessToken and twitter.oauth.secretToken should be substituted with the secrets provided by Twitter in the previous step where Twitter was set up for this exercise.
The last step is to alter the sequenceFlow to include the new activity we called ‘tweet’. The original sequenceFlow transitioning sendAcceptNotification to end needs to be changed and we need to add another sequenceFlow transitioning our new scriptTask to end.
<sequenceFlow id="flow1" sourceRef="sendAcceptNotification" targetRef="tweet"></sequenceFlow>
<sequenceFlow id="flow2" sourceRef="tweet" targetRef="end"></sequenceFlow>
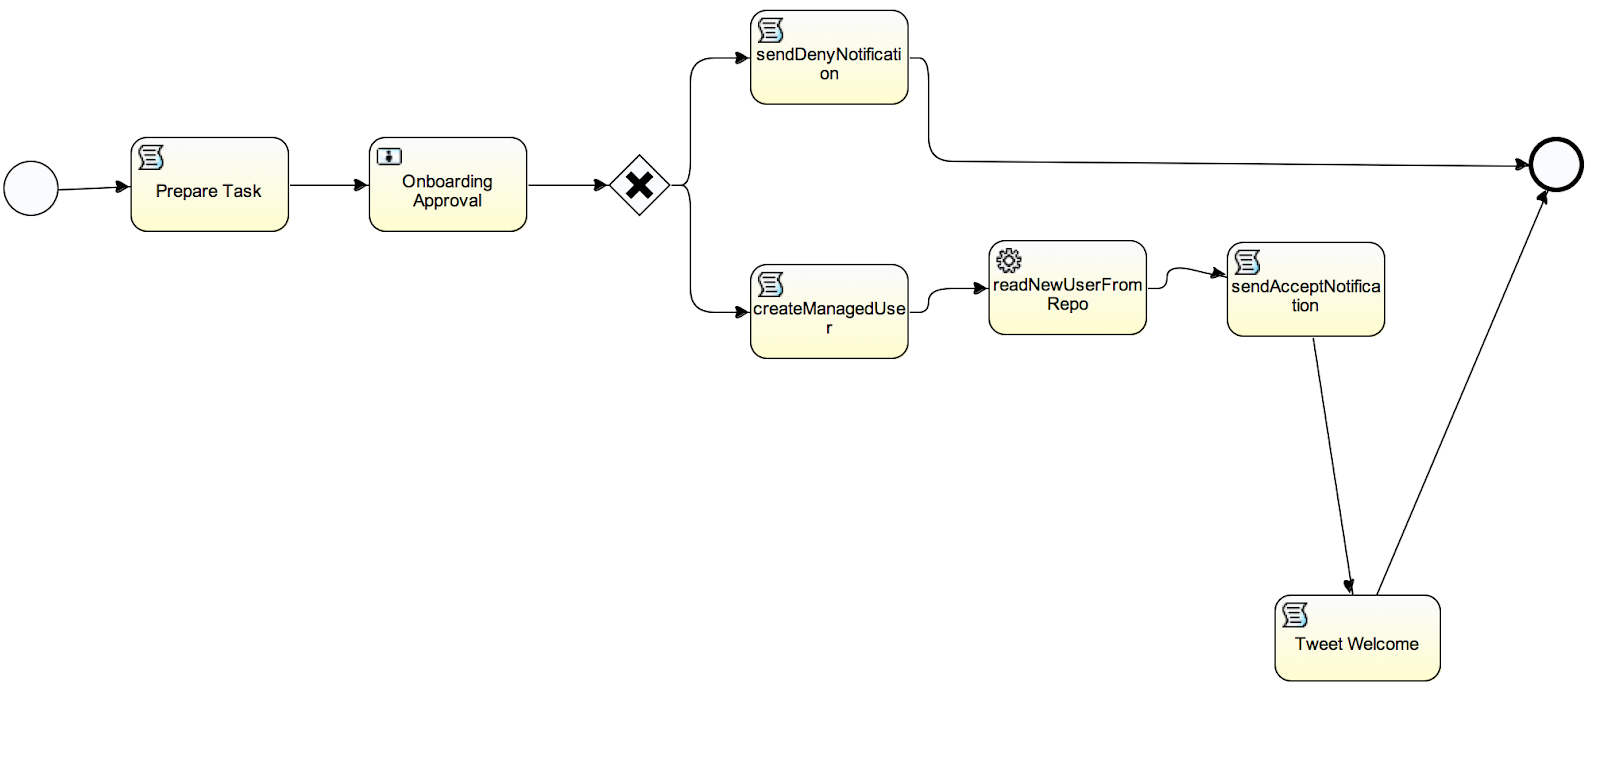 Diagram 2: The modified newUserCreate workflow
Once the changes are saved, its time to package the files into a bar-file and deploy the new workflow.
$ zip createNewUser.bar createNewUser.bpmn20.xml \
nUCDecideApprovalForm.xhtml nUCStartForm.xhtml
Now make sure the createNewUser.bar replaces the old bar in $OPENIDM/sample/usecase/usecase2twitter.
The current openidm instance running is using the usecase1 setup, we need to switch to usecase2twitter. To do this, shutdown OpenIDM and start it again with the -p switch pointing at the usecase2twitter directory.
$ ./startup.sh -p sample/usecase/usecase2twitter
Its now time to test our new workflow with the tweet addition.
To do this, just continue following the instructions provided in $OPENIDM/sample/usecase/README under usecase2 section.
2. Log in to the UI as user.1 (this user belongs to HR department, default password is 'Passw0rd')
3. Select the User Onboarding Process by clicking on it.
4. Fill the fields of the form presented by the UI. The fields marked with x are mandatory.
- Department field:
By selecting one of the four departments we define which department the new user
will belong to. Based on this the workflow will select the possible candidate assignees
for the manager approval user task: it will be either superadmin (as manager of everyone)
or the manager of the selected department (see description above).
example: if HR is selected the manager candidates will be user.0 and superadmin.
- User Type field:
if the User Type field is Employee then the user will have access to an account called "Business".
This is represented on the managed user in OpenIDM repository by having the following attribute on
the managed user:
accounts : [ "Business"]
if the User Type is Contractor then the new user won't have any accounts associated to it in
managed user representation in OpenIDM.
- Send Email Notification field:
If 'No' is selected for this field then no email notifications will be sent.
Notifications will be added to the OpenIDM repository which will appear on UI.
5. Start the workflow by clicking on Start button.
6. Log out and log in as the manager of the department selected in the initial start form
example: if HR was selected then log in as user.0
7. Click on the Onboarding approval task appearing on UI as task in the group queue
and assign the user task to user.0 (select 'Assign it to me'). The task appears now in 'My tasks'.
8. Click on the Task and then on the 'Details' button.
- Start Date field:
filling this field results in the user being created and adding the startDate property
to the user. Furthermore, the user status will be 'inactive'.
The field is optional, it will be used by TaskScanner to trigger sunrise workflow.
- End Date field:
filling this field results in the user being created and adding the startDate property
to the user.
The field is optional, it will be used by TaskScanner to trigger sunset workflow.
- Manager field:
Selecting yes will add 'title' field to the new managed user with the value 'manager'.
- Decision field:
Selecting 'Reject' terminates the workflow and sends a notification to the start user
of the workflow.
Complete the task by clicking on 'Complete' button.
9. If 'Accept' was selected then the user is created as a managed user in OpenIDM.
The password of the new user is "Passw0rd".
Two OpenIDM notifications are created about this event: one for the start user and one for the new user. Those are visible on the UI after login with the appropriate user - and to view our addition, check the twitter page for a new tweet.
To summarize, OpenIDM provides a flexible way to integrate with third party applications thru the use of Workflow. The possibilities here are endless.
Over and out - TGIF!
